本文最后更新于 2024年8月24日 晚上
冲刺。
当场景内存在多个高强度光源时,会导致相当一部分片段的颜色值大于1.0。而大于1.0部分的颜色值会被约束在1.0,因此会出现一片一片糊在一起的白色区域。
一种方法是减少场景内的光源强度,但这会引入不切实际的光照参数。更好的方法是允许颜色值超过1.0,然后将其映射到[0,1]之内。
通过使用高动态范围(High Dynamic Range,HDR),我们可以让片段的颜色超过1.0。首先,我们在光照方程中用更大范围的颜色值渲染,然后将所有HDR值转换到低动态范围(Low Dynamic Range, LDR)内。这个转换的过程叫做色调映射(Tone Mapping)。
在实时渲染中,HDR不仅允许让颜色值超过LDR范围,也允许我们根据光源的真实强度指定其强度。
对于使用标准化定点格式(如GL_RGB)的颜色缓冲,OpenGL会在将这些值存入帧缓冲前将其自动约束到LDR范围。当一个帧缓冲的颜色缓冲的内部格式被设置为GL_RGB16F、GL_RGBA16F、GL_RGB32F或GL_RGBA32F时,该帧缓冲便被称为浮点帧缓冲(Floating Point Buffer)。它可以存储超过LDR范围的浮点值。
1
2
3
4
5
6
7
8
9
10
11
glBindTexture (GL_TEXTURE_2D, colorBuffer);glTexImage2D (GL_TEXTURE_2D, 0 , GL_RGB16F, SCR_WIDTH, SCR_HEIGHT, 0 , GL_RGB, GL_FLOAT, NULL ); glBindFramebuffer (GL_FRAMEBUFFER, hdrFBO);glClear (GL_COLOR_BUFFER_BIT | GL_DEPTH_BUFFER_BIT); glBindFramebuffer (GL_FRAMEBUFFER, 0 );Use ();glActiveTexture (GL_TEXTURE0);glBindTexture (GL_TEXTURE_2D, hdrColorBufferTexture);RenderQuad ();
色调映射(Tone Mapping)用于在损失很小的前提下将浮点颜色值转换至LDR范围,并且伴有特定风格的色平衡(Stylistic Color Balance)。
Reinhard色调映射是最简单的色调映射。它平均地将所有亮度值分散到LDR上,并且通常伴随Gamma矫正过滤:
1
2
3
4
5
6
7
8
void main()const float gamma = 2.2 ;vec3 hdrColor = texture (hdrBuffer, TexCoords).rgb;vec3 mapped = hdrColor / (hdrColor + vec3 (1.0 ));pow (mapped, vec3 (1.0 / gamma));vec4 (mapped, 1.0 );
曝光(Exposure)参数用于设置不同光照条件下的光照参数,让画面无论是在高亮度条件还是低亮度条件下都能较好地呈现:
1
2
3
4
5
6
7
8
9
uniform float exposure;void main()const float gamma = 2.2 ;vec3 hdrColor = texture (hdrBuffer, TexCoords).rgb;vec3 mapped = vec3 (1.0 ) - exp (-hdrColor * exposure);pow (mapped, vec3 (1.0 / gamma));vec4 (mapped, 1.0 );
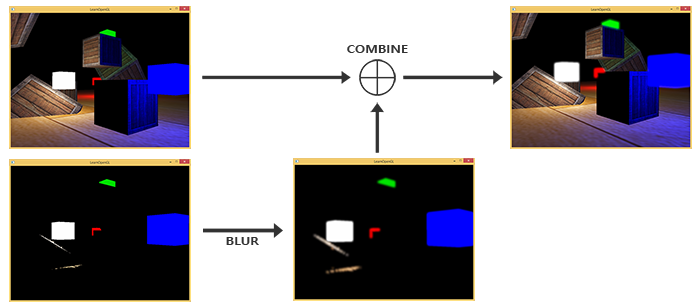
泛光(Bloom)是后处理技术的一种,用于在光源附近加上一层光晕。
泛光常常与HDR技术结合使用。其基本原理如下:
对于HDR颜色缓冲纹理,提取所有超过一定亮度的片段,得到一个新纹理。随后对这个新闻里进行高斯模糊处理,然后叠加到原来的颜色缓冲纹理上。
多渲染目标(Multiple Render Targets, MRT)用于指定多个片段着色器输出。
使用MRT的必要条件是当前的帧缓冲附加有多个颜色附件 。
1
2
3
4
5
6
7
8
9
10
11
12
13
14
15
16
17
18
19
20
21
22
GLuint hdrFBO;glGenFramebuffers (1 , &hdrFBO);glBindFramebuffer (GL_FRAMEBUFFER, hdrFBO);2 ];glGenTextures (2 , colorBuffers);for (GLuint i = 0 ; i < 2 ; i++)glBindTexture (GL_TEXTURE_2D, colorBuffers[i]);glTexImage2D (0 , GL_RGB16F, SCR_WIDTH, SCR_HEIGHT, 0 , GL_RGB, GL_FLOAT, NULL glTexParameteri (GL_TEXTURE_2D, GL_TEXTURE_MIN_FILTER, GL_LINEAR);glTexParameteri (GL_TEXTURE_2D, GL_TEXTURE_MAG_FILTER, GL_LINEAR);glTexParameteri (GL_TEXTURE_2D, GL_TEXTURE_WRAP_S, GL_CLAMP_TO_EDGE);glTexParameteri (GL_TEXTURE_2D, GL_TEXTURE_WRAP_T, GL_CLAMP_TO_EDGE);glFramebufferTexture2D (0 2 ] = { GL_COLOR_ATTACHMENT0, GL_COLOR_ATTACHMENT1 };glDrawBuffers (2 , attachments);
在片段着色器中使用layout关键字定义多个颜色缓冲输出:
1
2
3
4
5
6
7
8
9
10
11
12
#version 330 core layout (location = 0 ) out vec4 FragColor;layout (location = 1 ) out vec4 BrightColor;void main()vec4 (lighting, 1.0 f);float brightness = dot (FragColor.rgb, vec3 (0.2126 , 0.7152 , 0.0722 ));if (brightness > 1.0 )vec4 (FragColor.rgb, 1.0 );
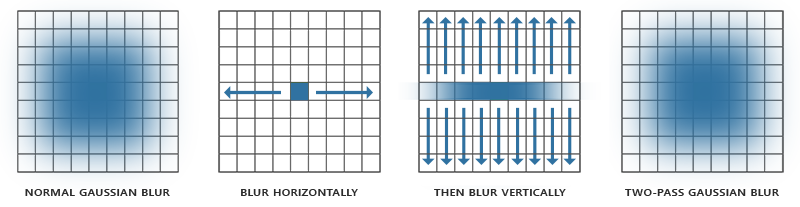
高斯模糊(Gaussian Blur)是一种基于核的后处理技术。高斯曲线是一种钟形曲线,将其扩展到二维便可以形成一个卷积核的权重。但这样做需要采样很多次,极大消耗性能。
为此,我们可以把二维方程拆解为两个一维方程,一个描述水平权重,一个描述垂直权重。如图:
该方法称为两步高斯模糊(Two-Pass Gaussian Blur)。我们用帧缓冲对象实现“两步”:在第一个帧缓冲对象进行水平模糊,然后将纹理传入第二个帧缓冲对象渲染时所用的着色器,进行垂直模糊。
1
2
3
4
5
6
7
8
9
10
11
12
13
14
15
16
17
18
19
20
21
22
23
#version 330 core out vec4 FragColor;in vec2 TexCoords;uniform sampler2D image;uniform bool horizontal; uniform float weight[5 ] = float [] (0.227027 , 0.1945946 , 0.1216216 , 0.054054 , 0.016216 ); void main(){ vec2 tex_offset = 1.0 / textureSize (image, 0 );vec3 result = texture (image, TexCoords).rgb * weight[0 ];if (horizontal){for (int i = 1 ; i < 5 ; ++i){texture (image, TexCoords + vec2 (tex_offset.x * i, 0.0 )).rgb * weight[i];texture (image, TexCoords - vec2 (tex_offset.x * i, 0.0 )).rgb * weight[i];else {for (int i = 1 ; i < 5 ; ++i){texture (image, TexCoords + vec2 (0.0 , tex_offset.y * i)).rgb * weight[i];texture (image, TexCoords - vec2 (0.0 , tex_offset.y * i)).rgb * weight[i];vec4 (result, 1.0 );
1
2
3
4
5
6
7
8
9
10
11
12
13
14
15
16
17
18
19
20
21
22
23
24
25
26
27
28
29
30
31
32
33
34
35
36
37
38
39
40
41
42
GLuint pingpongFBO[2 ];2 ];glGenFramebuffers (2 , pingpongFBO);glGenTextures (2 , pingpongBuffer);for (GLuint i = 0 ; i < 2 ; i++)glBindFramebuffer (GL_FRAMEBUFFER, pingpongFBO[i]);glBindTexture (GL_TEXTURE_2D, pingpongBuffer[i]);glTexImage2D (0 , GL_RGB16F, SCR_WIDTH, SCR_HEIGHT, 0 , GL_RGB, GL_FLOAT, NULL glTexParameteri (GL_TEXTURE_2D, GL_TEXTURE_MIN_FILTER, GL_LINEAR);glTexParameteri (GL_TEXTURE_2D, GL_TEXTURE_MAG_FILTER, GL_LINEAR);glTexParameteri (GL_TEXTURE_2D, GL_TEXTURE_WRAP_S, GL_CLAMP_TO_EDGE);glTexParameteri (GL_TEXTURE_2D, GL_TEXTURE_WRAP_T, GL_CLAMP_TO_EDGE);glFramebufferTexture2D (0 true , first_iteration = true ;10 ;Use ();for (GLuint i = 0 ; i < amount; i++)glBindFramebuffer (GL_FRAMEBUFFER, pingpongFBO[horizontal]); glUniform1i (glGetUniformLocation (shaderBlur.Program, "horizontal" ), horizontal);glBindTexture (1 ] : pingpongBuffers[!horizontal]RenderQuad ();if (first_iteration)false ;glBindFramebuffer (GL_FRAMEBUFFER, 0 );
随后,在片段着色器中定义两个sampler2D,一个是原始画面,一个是经模糊的HDR筛选画面,将二者采样后相加即可得到最终颜色。
目前为止我们使用的光照方式皆为前向渲染(Forward Rendering),在场景中我们根据所有光源渲染一个物体,然后再渲染下一个物体,以此类推。但是,这种方式对于每一个需要渲染的物体,程序都需要对每一个光源进行迭代。当片段和光源数量持续增加时,需要迭代的次数将会爆炸式增长。
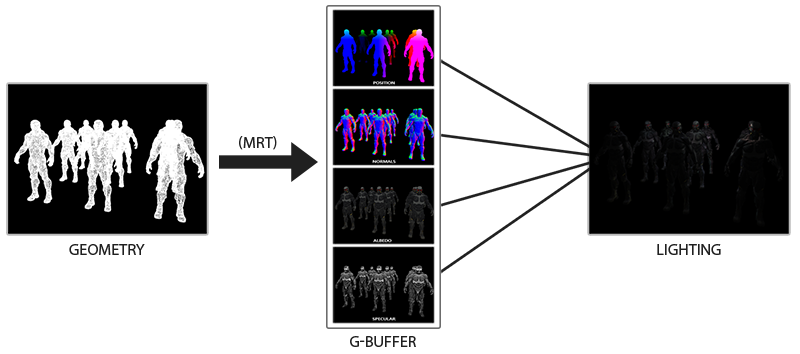
为了解决这一问题,我们引入延迟渲染法(Deferred Renderring)。该方法将光照等计算量较大的过程推迟到后期进行。延迟渲染分为两个过程(Pass),几何处理Pass和光照处理Pass。
在几何处理Pass中,首先渲染场景一次,以获取各类几何信息(如位置、颜色、法线、镜面值),并将其存储在被称为G缓冲(G-Buffer)的纹理中。
在光照处理Pass中,使用G缓冲中的数据(而非顶点着色器传入的数据)对每个片段计算场景光照。这种方法避免了无Early-Z情况下的单像素多次渲染,确保了每个像素只调用一次片段着色器。
延迟渲染的缺点是:
消耗显存多,因为G-Buffer中要存储大量数据
因为只有最前方的片段信息,所以无法使用Blend渲染半透明物体
因为需要MRT技术支持,延迟渲染需要的RT数量极多,如果使用MSAA的话每个RT的分辨率都要翻倍,需要消耗极大的显存,所以一般说延迟渲染不支持MSAA
G-Buffer用来存储所有跟光照有关的数据,包括:
3D位置向量
RGB漫反射颜色向量,即反照率(Albedo)
3D法向量
镜面强度浮点值
光源位置与颜色向量
相机位置
其中,后两点对于所有的片段都相同,可以通过uniform设置。而剩余变量对于每个变量都不同,所以可以使用G-Buffer传输。
使用MRT技术,每个变量对应一个RT。过程如下:
初始化FBO,它包含了若干颜色缓冲和一个深度缓冲对象。位置和法向量使用高精度纹理,反照率和镜面值使用默认精度。
1
2
3
4
5
6
7
8
9
10
11
12
13
14
15
16
17
18
19
20
21
22
23
24
25
26
27
28
29
30
31
32
33
34
35
36
GLuint gBuffer;glGenFramebuffers (1 , &gBuffer);glBindFramebuffer (GL_FRAMEBUFFER, gBuffer);glGenTextures (1 , &gPosition);glBindTexture (GL_TEXTURE_2D, gPosition);glTexImage2D (GL_TEXTURE_2D, 0 , GL_RGB16F, SCR_WIDTH, SCR_HEIGHT, 0 , GL_RGB, GL_FLOAT, NULL );glTexParameteri (GL_TEXTURE_2D, GL_TEXTURE_MIN_FILTER, GL_NEAREST);glTexParameteri (GL_TEXTURE_2D, GL_TEXTURE_MAG_FILTER, GL_NEAREST);glFramebufferTexture2D (GL_FRAMEBUFFER, GL_COLOR_ATTACHMENT0, GL_TEXTURE_2D, gPosition, 0 glGenTextures (1 , &gNormal);glBindTexture (GL_TEXTURE_2D, gNormal);glTexImage2D (GL_TEXTURE_2D, 0 , GL_RGB16F, SCR_WIDTH, SCR_HEIGHT, 0 , GL_RGB, GL_FLOAT, NULL );glTexParameteri (GL_TEXTURE_2D, GL_TEXTURE_MIN_FILTER, GL_NEAREST);glTexParameteri (GL_TEXTURE_2D, GL_TEXTURE_MAG_FILTER, GL_NEAREST);glFramebufferTexture2D (GL_FRAMEBUFFER, GL_COLOR_ATTACHMENT1, GL_TEXTURE_2D, gNormal, 0 );glGenTextures (1 , &gAlbedoSpec);glBindTexture (GL_TEXTURE_2D, gAlbedoSpec);glTexImage2D (GL_TEXTURE_2D, 0 , GL_RGBA, SCR_WIDTH, SCR_HEIGHT, 0 , GL_RGBA, GL_FLOAT, NULL );glTexParameteri (GL_TEXTURE_2D, GL_TEXTURE_MIN_FILTER, GL_NEAREST);glTexParameteri (GL_TEXTURE_2D, GL_TEXTURE_MAG_FILTER, GL_NEAREST);glFramebufferTexture2D (GL_FRAMEBUFFER, GL_COLOR_ATTACHMENT2, GL_TEXTURE_2D, gAlbedoSpec, 0 );3 ] = { GL_COLOR_ATTACHMENT0, GL_COLOR_ATTACHMENT1, GL_COLOR_ATTACHMENT2 };glDrawBuffers (3 , attachments);
完成几何处理阶段后,进入光照处理阶段。
此阶段,首先渲染一个铺屏四边形,然后在四边形的每个像素上运行一次片段着色器:
1
2
3
4
5
6
7
8
9
10
11
12
glClear (GL_COLOR_BUFFER_BIT | GL_DEPTH_BUFFER_BIT);Use ();glActiveTexture (GL_TEXTURE0);glBindTexture (GL_TEXTURE_2D, gPosition);glActiveTexture (GL_TEXTURE1);glBindTexture (GL_TEXTURE_2D, gNormal);glActiveTexture (GL_TEXTURE2);glBindTexture (GL_TEXTURE_2D, gAlbedoSpec);SendAllLightUniformsToShader (shaderLightingPass);glUniform3fv (glGetUniformLocation (shaderLightingPass.Program, "viewPos" ), 1 , &camera.Position[0 ]);RenderQuad ();
1
2
3
4
5
6
7
8
9
10
11
12
13
14
15
16
17
18
19
20
21
22
23
24
25
26
27
28
29
30
31
32
33
34
35
36
37
#version 330 core out vec4 FragColor;in vec2 TexCoords;uniform sampler2D gPosition;uniform sampler2D gNormal;uniform sampler2D gAlbedoSpec;vec3 Position;vec3 Color;const int NR_LIGHTS = 32 ;uniform Light lights[NR_LIGHTS];uniform vec3 viewPos;void main()vec3 FragPos = texture (gPosition, TexCoords).rgb;vec3 Normal = texture (gNormal, TexCoords).rgb;vec3 Albedo = texture (gAlbedoSpec, TexCoords).rgb;float Specular = texture (gAlbedoSpec, TexCoords).a;vec3 lighting = Albedo * 0.1 ; vec3 viewDir = normalize (viewPos - FragPos);for (int i = 0 ; i < NR_LIGHTS; ++i)vec3 lightDir = normalize (lights[i].Position - FragPos);vec3 diffuse = max (dot (Normal, lightDir), 0.0 ) * Albedo * lights[i].Color;vec4 (lighting, 1.0 );
为了克服延迟渲染的缺点(如无法Blend),一般采用延迟与正向渲染相结合的方式。
对于光源,我们无需考虑其受光照影响,所以首先渲染光立方体。但渲染完毕后,我们发现,因为没有获取到延迟渲染中的深度信息,光立方体无法正常进行深度测试。为此,我们需要把延迟渲染的几何处理阶段中存储的深度信息输出到默认帧缓冲的深度缓冲中。
使用glBlitFrameBuffer函数将帧缓冲的内容复制到另一个帧缓冲:
1
2
3
4
5
6
glBindFramebuffer (GL_READ_FRAMEBUFFER, gBuffer);glBindFramebuffer (GL_DRAW_FRAMEBUFFER, 0 ); glBlitFramebuffer (0 , 0 , SCR_WIDTH, SCR_HEIGHT, 0 , 0 , SCR_WIDTH, SCR_HEIGHT, GL_DEPTH_BUFFER_BIT, GL_NEARESTglBindFramebuffer (GL_FRAMEBUFFER, 0 );
类似地,我们也可以传输其他缓冲到默认帧缓冲。
延迟渲染本身并不能支持大量光源,因为即便是在铺屏四边形的逐像素渲染中,假设有1000个光源,我们还是要考虑每个光源对像素的贡献,无论光源有多远。为了解决这一问题,我们引入光体积(Light Volumns)技术:
光体积的基本原理是计算光源的半径,即光能够到达片段的范围。计算光照贡献时,我们只需要考虑覆盖在各个光源范围内的片段就可以了。
在之前计算点光源衰减时,我们使用了常量+线性量+平方量的高级衰减方程。
F l i g h t = I K c + K l ∗ d + K q ∗ d 2 F_{light} = \frac{I}{K_c + K_l * d + K_q * d^2} F l i g h t = K c + K l ∗ d + K q ∗ d 2 I
其中,F l i g h t F_{light} F l i g h t I I I
但这个方程永远不会真正等于0,所以我们需要选择一个合适的“黑暗阈值”。在这里,我们使用5/256作为阈值。
5 256 = I m a x K c + K l ∗ d + K q ∗ d 2 \frac{5}{256} = \frac{I_{max}}{K_c + K_l * d + K_q * d^2}
2 5 6 5 = K c + K l ∗ d + K q ∗ d 2 I m a x
其中,I m a x I_{max} I m a x d d d
通过求根公式我们可以求出:
d = − K l + K l 2 − 4 ∗ K q ∗ ( K c − I m a x ∗ 256 5 ) 2 ∗ K q d = \frac{-K_l + \sqrt{K_l^2 - 4 * K_q * (K_c - I_{max} * \frac{256}{5})}}{2 * K_q} d = 2 ∗ K q − K l + K l 2 − 4 ∗ K q ∗ ( K c − I m a x ∗ 5 2 5 6 )
转换为代码:
1
2
3
4
5
6
7
GLfloat constant = 1.0 ; 0.7 ;1.8 ;fmaxf (std::fmaxf (lightColor.r, lightColor.g), lightColor.b);sqrtf (linear * linear - 4 * quadratic * (constant - (256.0 / 5.0 ) * lightMax))) 2 * quadratic);
1
2
3
4
5
6
7
8
9
10
11
12
13
14
15
struct Light {float Radius;void main(){for (int i = 0 ; i < NR_LIGHTS; ++i){float distance = length (lights[i].Position - FragPos);if (distance < lights[i].Radius){
但是问题是,着色器运行时总是会执行if语句所有的分支,因为GPU上的着色器程序是高度并行的,必须要确保每次运行着色器的代码都是一样的。因此,上面的着色器代码中的if判断实际上无用 。
为了解决这一问题,我们可以使用延迟渲染的方式,将每个光源的光体积球渲染出来,将其作为一个单独的RT,然后在实际计算光照时采样这个RT即可。
**延迟光照(Deferred Lighting)和 切片式延迟着色法(Tile-based Deferred Shading)**是比渲染光体积更优的方法,并且这两种方法允许MSAA。
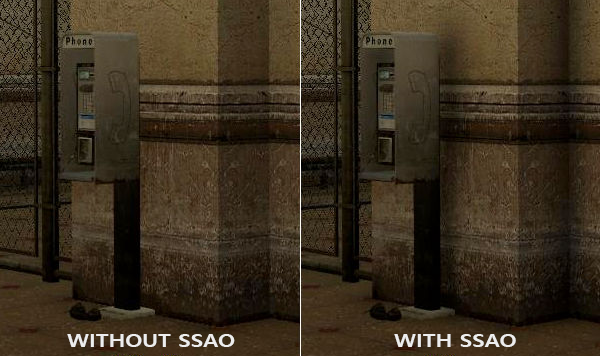
Phong模型中的环境光照(Ambient Lighting)常量用于模拟光的散射(Scattering)。但在现实里,光线会以任意方向散射,它的强度会不断发生改变。环境光遮蔽(Ambient Occlusion)用于模拟更真实的间接光,它通过将褶皱、孔洞和非常靠近的墙面所处的片段变暗来模拟出间接光照。
实现真正意义上的环境光遮蔽需要对每个片段周围的几何体的情况进行确认,开销较大。为解决这一问题,我们引入屏幕空间环境光遮蔽(Screen-Space Ambient Occlusion, SSAO)技术,该技术使用屏幕空间的场景深度而非真实几何体数据来确定屏蔽量。
SSAO的底层原理是:对于铺屏四边形上的每个片段,都根据周围的深度值计算一个遮蔽因子(Occlusion Factor)。这个遮蔽因子在之后用于抵消片段的环境光照分量。
遮蔽因子通过采集片段周围球形核(Kernel)的多个深度样本,并和当前片段的深度值对比得到。高于片段深度值样本的个数就是遮蔽因子。
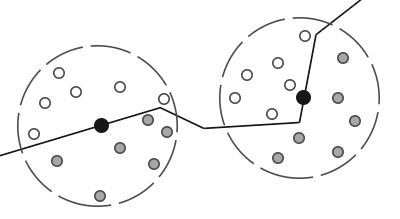
如图,黑色折线代表几何体表面,球形代表核的范围。灰色采样点代表位于几何体内部的采样点,它们能对遮蔽因子产生影响。灰色样本越多,遮蔽因子越大,简介光照越暗。
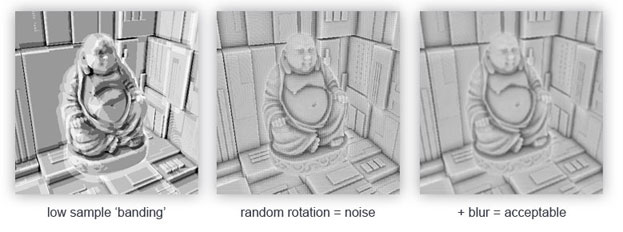
对于这种方式,采样的样本数量和最终效果有着非常直接的关系。若样本数量太低,精度就会急剧减少,导致波纹(Banding)效果;若样本数量太高,又会影响性能。
为此,我们通过给采样核心(Sample Kernel)引入随机性,从而在减少样本数的情况下优化效果。但是随机性会引入噪点,因此,给结果叠加一个模糊处理效果会更好。如图:
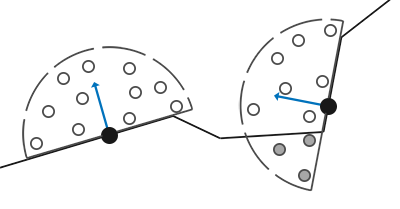
即便是平整的墙面,球形采样核心也会囊括入约一半的采样点。但只有狭窄、内缩的表面才需要进行遮蔽。因此,我们使用沿表面法向量的半球形采样核心(被称为法向半球体,Normal-oriented Hemisphere)。如图:
使用SSAO,我们需要获取以下数据:
片段位置向量
片段法线向量
片段反射颜色
采样核心
用于旋转采样核心的随机旋转向量
SSAO是一种屏幕空间技术,因此不难发现,它非常适合在延迟渲染管线中使用,因为它可以直接通过G-Buffer获取所有需要的屏幕空间数据。
我们在片段着色器中,使用内建变量gl_FragCoord.z获取非线性片段深度,并可以将其变为线性深度值:
1
2
3
4
float LinearizeDepth(float depth){float z = depth * 2.0 - 1.0 ; return (2.0 * NEAR * FAR) / (FAR + NEAR - z * (FAR - NEAR));
提取的线性深度基于观察空间,因此需要确保G-Buffer中的位置和法线都处于观察空间。
我们也可以通过深度值重构位置向量,这是一种优化技巧:
Position From Depth 3: Back In The Habit – The Danger Zone (wordpress.com)
对每个表面法线方向生成采样核心比较困难,所以我们会在切线空间生成采样核心,所有核心的朝向都指向正z方向,即表面法向量。
1
2
3
4
5
6
7
8
9
10
11
12
13
14
15
16
17
18
std::uniform_real_distribution<GLfloat> randomFloats (0.0 , 1.0 ) ; for (GLuint i = 0 ; i < 64 ; ++i)glm::vec3 sample ( randomFloats(generator) * 2.0 - 1.0 , randomFloats(generator) * 2.0 - 1.0 , randomFloats(generator) ) normalize (sample);randomFloats (generator); GLfloat (i) / 64.0 ; lerp (0.1f , 1.0f , scale * scale); push_back (sample);
因为我们不可能在每次片段计算时都生成随机数,所以上面提到的带有随机性的采样核心会被运用至所有片段,但这会导致随机性偏少。
为了解决这一问题,我们创建一个随机旋转向量纹理并将其平铺至屏幕,通过采样来获取旋转向量。
1
2
3
4
5
6
7
8
9
10
11
12
13
14
15
16
17
18
std::vector<glm::vec3> ssaoNoise;for (GLuint i = 0 ; i < 16 ; i++)glm::vec3 noise ( randomFloats(generator) * 2.0 - 1.0 , randomFloats(generator) * 2.0 - 1.0 , 0.0f ) push_back (noise);glGenTextures (1 , &noiseTexture);glBindTexture (GL_TEXTURE_2D, noiseTexture);glTexImage2D (GL_TEXTURE_2D, 0 , GL_RGB16F, 4 , 4 , 0 , GL_RGB, GL_FLOAT, &ssaoNoise[0 ]);glTexParameteri (GL_TEXTURE_2D, GL_TEXTURE_MIN_FILTER, GL_NEAREST);glTexParameteri (GL_TEXTURE_2D, GL_TEXTURE_MAG_FILTER, GL_NEAREST);glTexParameteri (GL_TEXTURE_2D, GL_TEXTURE_WRAP_S, GL_REPEAT);glTexParameteri (GL_TEXTURE_2D, GL_TEXTURE_WRAP_T, GL_REPEAT);
SSAO着色器计算的是逐片段的遮蔽值而非最终的颜色,因此我们使用一个独立的帧缓冲计算SSAO结果,并将结果存储至纹理附件供后续叠加使用。
为什么不用MRT?
SSAO与最终颜色输出之间存在先后关系,凡是存在先后关系的都不能用MRT。
1
2
3
4
5
6
7
8
9
10
11
12
GLuint ssaoFBO;glGenFramebuffers (1 , &ssaoFBO); glBindFramebuffer (GL_FRAMEBUFFER, ssaoFBO);glGenTextures (1 , &ssaoColorBuffer);glBindTexture (GL_TEXTURE_2D, ssaoColorBuffer);glTexImage2D (GL_TEXTURE_2D, 0 , GL_RED, SCR_WIDTH, SCR_HEIGHT, 0 , GL_RGB, GL_FLOAT, NULL );glTexParameteri (GL_TEXTURE_2D, GL_TEXTURE_MIN_FILTER, GL_NEAREST);glTexParameteri (GL_TEXTURE_2D, GL_TEXTURE_MAG_FILTER, GL_NEAREST);glFramebufferTexture2D (GL_FRAMEBUFFER, GL_COLOR_ATTACHMENT0, GL_TEXTURE_2D, ssaoColorBuffer, 0 );
SSAO完整渲染流程如下:
1 2 3 4 5 6 7 8 9 10 11 12 13 14 15 16 17 18 19 20 21 22 23 24 25 26 27 28 glBindFramebuffer (GL_FRAMEBUFFER, gBuffer);glBindFramebuffer (GL_FRAMEBUFFER, 0 ); glBindFramebuffer (GL_FRAMEBUFFER, ssaoFBO);glClear (GL_COLOR_BUFFER_BIT);Use ();glActiveTexture (GL_TEXTURE0);glBindTexture (GL_TEXTURE_2D, gPositionDepth);glActiveTexture (GL_TEXTURE1);glBindTexture (GL_TEXTURE_2D, gNormal);glActiveTexture (GL_TEXTURE2);glBindTexture (GL_TEXTURE_2D, noiseTexture);SendKernelSamplesToShader ();glUniformMatrix4fv (projLocation, 1 , GL_FALSE, glm::value_ptr (projection));RenderQuad ();glBindFramebuffer (GL_FRAMEBUFFER, 0 );glClear (GL_COLOR_BUFFER_BIT | GL_DEPTH_BUFFER_BIT);Use ();glActiveTexture (GL_TEXTURE3);glBindTexture (GL_TEXTURE_2D, ssaoColorBuffer);RenderQuad ();
SSAO着色器代码:
1
2
3
4
5
6
7
8
9
10
11
12
13
14
15
16
17
18
19
20
21
22
23
24
25
26
27
28
29
30
31
32
33
34
35
36
37
38
39
40
41
42
43
44
45
#version 330 core out float FragColor;in vec2 TexCoords;uniform sampler2D gPositionDepth;uniform sampler2D gNormal;uniform sampler2D texNoise;uniform vec3 samples[64 ];uniform mat4 projection;const vec2 noiseScale = vec2 (800.0 /4.0 , 600.0 /4.0 ); void main(){vec3 fragPos = texture (gPositionDepth, TexCoords).xyz;vec3 normal = texture (gNormal, TexCoords).rgb;vec3 randomVec = texture (texNoise, TexCoords * noiseScale).xyz;vec3 tangent = normalize (randomVec - normal * dot (randomVec, normal));vec3 bitangent = cross (normal, tangent);mat3 TBN = mat3 (tangent, bitangent, normal);sample = fragPos + sample * radius; float occlusion = 0.0 ; for (int i = 0 ; i < kernelSize; ++i){vec3 sample = TBN * samples[i]; sample = fragPos + sample * radius; vec4 offset = vec4 (sample , 1.0 );offset = projection * offset ; offset .xyz /= offset .w; offset .xyz = offset .xyz * 0.5 + 0.5 ; float sampleDepth = -texture (gPositionDepth, offset .xy).w;float rangeCheck = smoothstep (0.0 , 1.0 , radius / abs (fragPos.z - sampleDepth));sample .z ? 1.0 : 0.0 ) * rangeCheck; 1.0 - (occlusion / kernelSize);
现在这版会由于采样点数量以及随机性的限制,出现噪点。所以我们需要对SSAO输出进行模糊。
由于存在先后关系(先SSAO,后Blur),所以使用FBO:
1
2
3
4
5
6
7
8
9
GLuint ssaoBlurFBO, ssaoColorBufferBlur;glGenFramebuffers (1 , &ssaoBlurFBO);glBindFramebuffer (GL_FRAMEBUFFER, ssaoBlurFBO);glGenTextures (1 , &ssaoColorBufferBlur);glBindTexture (GL_TEXTURE_2D, ssaoColorBufferBlur);glTexImage2D (GL_TEXTURE_2D, 0 , GL_RED, SCR_WIDTH, SCR_HEIGHT, 0 , GL_RGB, GL_FLOAT, NULL );glTexParameteri (GL_TEXTURE_2D, GL_TEXTURE_MIN_FILTER, GL_NEAREST);glTexParameteri (GL_TEXTURE_2D, GL_TEXTURE_MAG_FILTER, GL_NEAREST);glFramebufferTexture2D (GL_FRAMEBUFFER, GL_COLOR_ATTACHMENT0, GL_TEXTURE_2D, ssaoColorBufferBlur, 0 );
1
2
3
4
5
6
7
8
9
10
11
12
13
14
15
16
17
18
19
#version 330 core in vec2 TexCoords;out float fragColor;uniform sampler2D ssaoInput;void main() {vec2 texelSize = 1.0 / vec2 (textureSize (ssaoInput, 0 ));float result = 0.0 ;for (int x = -2 ; x < 2 ; ++x) for (int y = -2 ; y < 2 ; ++y) vec2 offset = vec2 (float (x), float (y)) * texelSize;texture (ssaoInput, TexCoords + offset ).r;4.0 * 4.0 );
1
2
3
4
5
6
7
8
9
10
11
12
13
14
15
16
17
18
19
20
21
22
23
24
25
26
27
28
29
30
31
32
33
34
35
36
37
38
39
40
41
42
43
44
45
46
47
#version 330 core out vec4 FragColor;in vec2 TexCoords;uniform sampler2D gPositionDepth;uniform sampler2D gNormal;uniform sampler2D gAlbedo;uniform sampler2D ssao;vec3 Position;vec3 Color;float Linear;float Quadratic;float Radius;uniform Light light;void main()vec3 FragPos = texture (gPositionDepth, TexCoords).rgb;vec3 Normal = texture (gNormal, TexCoords).rgb;vec3 Diffuse = texture (gAlbedo, TexCoords).rgb;float AmbientOcclusion = texture (ssao, TexCoords).r;vec3 ambient = vec3 (0.3 * AmbientOcclusion); vec3 lighting = ambient; vec3 viewDir = normalize (-FragPos); vec3 lightDir = normalize (light.Position - FragPos);vec3 diffuse = max (dot (Normal, lightDir), 0.0 ) * Diffuse * light.Color;vec3 halfwayDir = normalize (lightDir + viewDir); float spec = pow (max (dot (Normal, halfwayDir), 0.0 ), 8.0 );vec3 specular = light.Color * spec;float dist = length (light.Position - FragPos);float attenuation = 1.0 / (1.0 + light.Linear * dist + light.Quadratic * dist * dist);vec4 (lighting, 1.0 );